Hello friends. We have had exciting developments happen over the last few weeks which I would like to share.
Firstly we moved out of our rental house (Stage 0) and moved into 3 cabins and a small wooden shed on Lot 6 - we are officially on our own land!! Certainly is quite a change going from a generous sized 230m2 home in Christchurch, to 100m2 rental, and now somewhere in the order of 40m2 living on site .... it takes getting used to, but we are exploring our adaptability even with two young kids. This epic move marks Stage 1 of our move to our land, which is reminiscent of passing through the eye of the needle :)
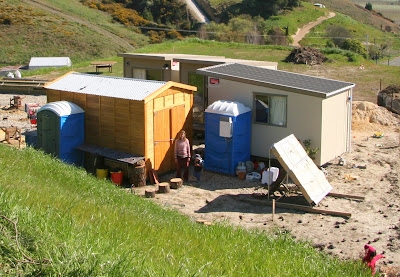 |
| Our temporary living arrangements. This incorporates 3 portable cabins, a wooden shed, portaloo and porta-shower equiped with a califont for instant hot water. |
Secondly we have been witnessing the birth of our pole shed. In a previous post I mentioned that we were building a post and beam weatherboard shed which will eventually become our garage and workshop/craft room area. The work on this has been steadily progressing and things have been rather busy. We have hired a team of two highly skilled builders - Kenny and Ray, and they are absolute building machines! Kenny is from Scotland, but he doesn't wear a kilt to work ;)
So how exactly does one build a pole shed? ... I'm glad you asked :) I will try to give you a pictorial summation.
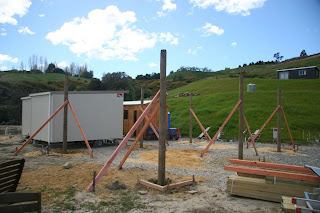
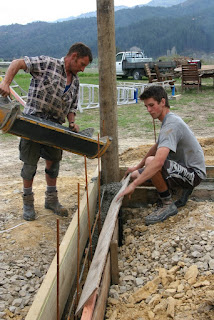
The very first thing you need is a design with suitable mechanical drawings. We got ours from a local building supply store as part of their package, so that part was easy. After filing for the building consent and it being granted, the next part was marking up the areas that need to be dug out to for the poles.
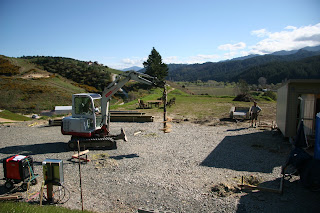 |
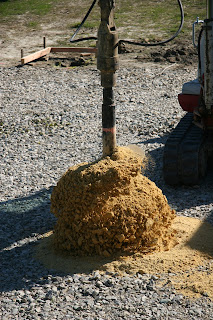
| We don't dig the holes out by hand - we use a digger with an auger bit. This is a mother drill bit which digs 600mm diameter holes in the ground. |
 |
| Position ... |
 |
| Drill ... |
 |
| Lift ... |
 |
| Dump ... |
Rinse and repeat until you have 6 holes about 1.2m deep - these are big momma holes.
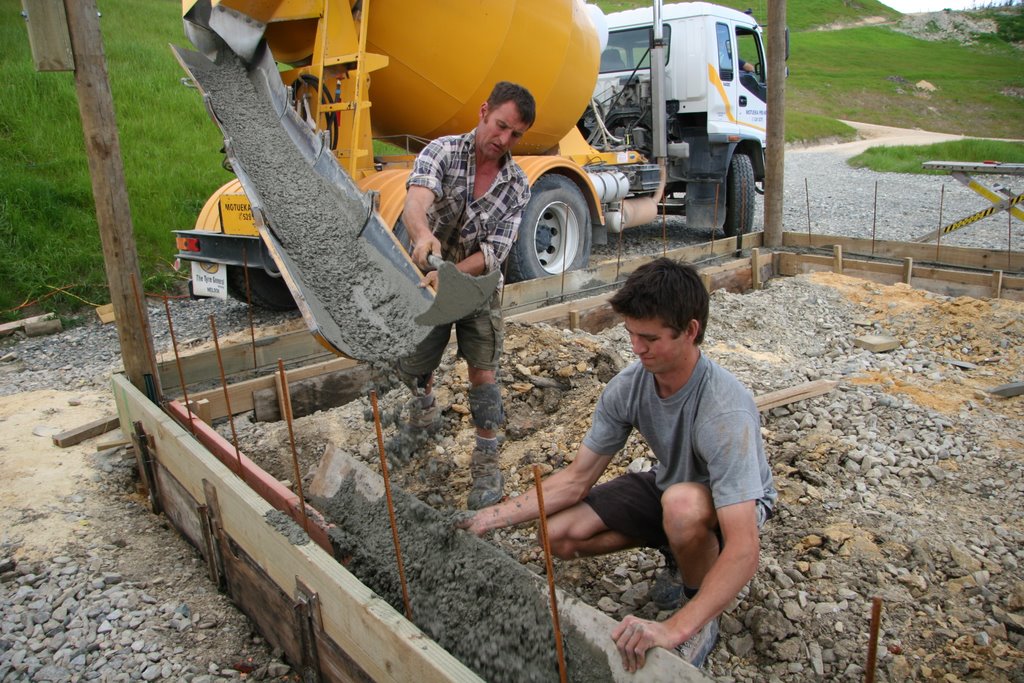
The next step is to position the poles in the holes, and then pour concrete to set them in. I have a love hate relationship with concrete due
to the high embodied energy in cement and high carbon footprint in
the manufacture of concrete. However there really isn't much of an
alternative when it comes to securing foundations for a building - would
be great to hear from you if you have suggestions.
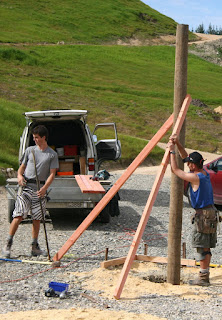 |
| Secure the poles with some bracing. |
 |
| Like thus ... |
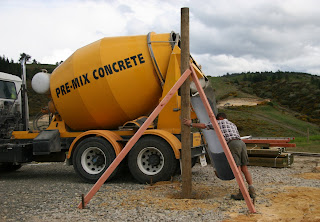 |
| Then add concrete ... |
 |
| This provides good entertainment for the locals. |
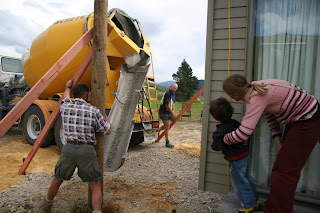 |
| The concrete truck fascinates Jordan, he wants to drive one when he grows up ... |
Once the poles are set, they get cut down to size.
As the poles are round, they need to be surfaced flat so that the rafters fit square on to them and are much better supported this way.
 |
| The rafters go up ... |
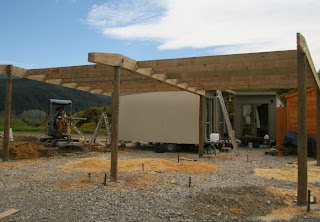 |
| Purlins go across the rafters. |
The purlins are attached using joist hangers, which are metal brackets that attach the pieces of wood very securely together.
The digger is brought in to dig out the required trenches for the concrete ring foundation. This shed will be enclosed all around and the walls will be timber framed.
 |
| So far, the project management team look happy ... |
The boxing and wire mesh go in next for the ring foundation.

A laser level is used to mark the level line of the floor. This particular gadget levels itself automatically and then sends out the laser pulse which is picked up with the receiving unit shown here.
Kenny attaches some piping so that we can get cables in later. Unlike what we did, it would be better to use a stiffer and thinner walled conduit pipe as it is easier to get more volume of cables through it later. Also it is better to put in more pipes than you think you will need, as you really just don't know if you're going to need more some day.
The concrete truck arrives to pour the ring foundation. The extra vertical steel rebar is added and will be later folded down to tie the main floor to the ring foundation when the floor is poured. This will help the foundation and the floor move as a cohesive block in the event of an earthquake - something we know only too much about coming from Christchurch. This work is pretty hard going and not particularly glamorous, but the boys are happy with the outcome.
Next the floor is prepared with a layer of gravel (AP40 to be exact), followed by 50mm of polystyrene insulation, a layer of foil, and then more wire mesh. I didn't entirely fancy the idea of using polystyrene, however I did conceded that if there was a single really useful application for the stuff it would be for flooring insulation - it is kinda hard to beat as it entraps air (one of the best insulators known) remarkably well and lasts a long long time. Again, it would be good to get your views on this.
Most sheds don't have insulated floors, but I wanted it to be warm with relatively low energy inputs. After all, no man wants to be cold in his cave ;) The layer of foil was added at the last minute, as I thought it would be great to get some radiative heat reflected back up as well - I certainly think it would help, and didn't cost that much more to add.
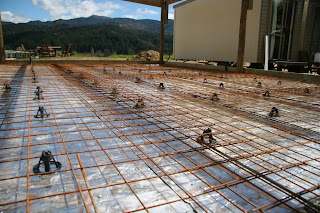 |
| The finished floor before the floor is poured. |
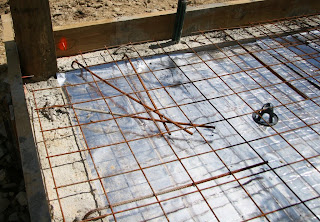 |
| Note the vertical bars from the ring foundation are bent down into the floor mesh, making it a cohesive block. This technique is now the defacto standard for floors since the Christchurch earthquake, before that it was only ever done for multi storey houses. |
The concrete flooring guys turn up next, more concrete - a 100mm of it over the entire floor.
These guys are real flooring professionals - they make the job look easy and they were basically done in one short morning. This unfortunately was a more attractive option than a timber floor because it was more cost effective. We didn't want a financial blow out on the shed to affect the house build, so we made some executive decisions.
 |
| Even she was impressed ... |
 |
| The entrance to the garage portion of the shed is rebated lower, making it easier to clean and allowing a small step for the vehicle to move in, as well as making a better seal for the roller door. |
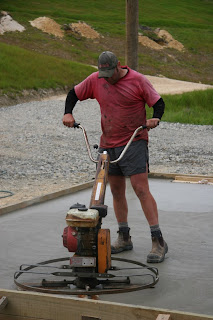 |
| The floor is given a smooth finish with this powered float machine, cost a bit extra but the floor was very smooth - makes for easier cleaning. |
 |
| The finished product is quality tested by the engineering team. Usually you have to not let the floor get too hot when it is drying or cracks may appear - however we had the benefit of rain just in time to help keep things cooler. |
Right, the floor is done - now what? ... the roof, of course :) Across the purlins first is some chicken wire. The job of this is to hold the roofing paper that will sit under the Zinc Alume roofing to prevent condensed moisture from raining down inside the building. After both are laid down, the roofing panels are then installed - and voila, we've got a roof!

 |
| Cross bracing tensioners are added across one of the bays to give it better rigidity and strength. | |
|
 |
| We have a roof! |

Timber framing is next to build up the walls, windows and doorways.
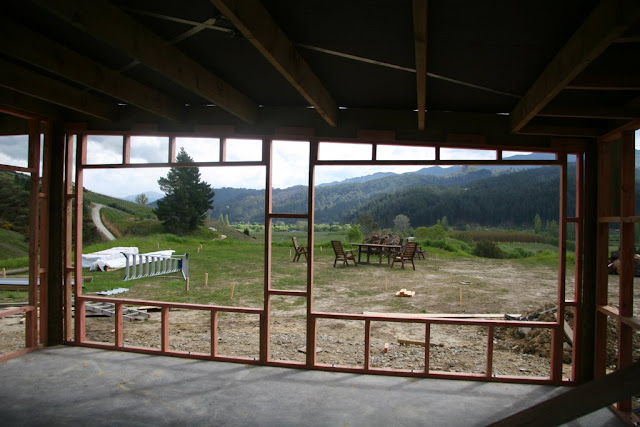 |
| Pretty view aye! :) |
Then its the building paper layer over the timber frame, and the weather boards on top of that. We have chosen to go with a rather forgottened
wood here in NZ called Larch. It has a nice looking grain and at $5/linear meter is good value for money. We will be giving a natural oil finish (produced locally here in Motueka might I add) to protect it from the elements.
Up to this point we were drawing power from a stand alone meter board. This needs to be placed on the shed so a trench had to be dug - it took us the better part of 1 day to dig trench about 0.8m deep, sure is hard work. We had a friendly villager help with that too :) Note the electrical wire goes up the pipe that we buried in the concrete footing earlier, but this is where we found it to be constrained due to the thickish wall of the pipe ... so bear that in mind if you are putting pipes in on your next building.
 |
| This shows the meter board now mounted on the shed, and more of the weather boards have been attached. |
The windows are fitted into place, and so are the doors and roller door on the garage side. All the windows and doors were purchased 2nd hand from TradeMe (local ebay equivalent) - they do have their quirks but offer a functional purpose for not a lot of money up front.
Battens (running towards the slider door) are affixed to the bottom of the purlins in preparation for the ceiling to be put in. Also wool insulation is placed in the ceiling and walls to keep it nice and warm with minimal energy input. The wool insulation was also obtained 2nd hand - I managed to get them for $13/m2, delivered! ... not bad for something that is usually in the $35-40/m2 range.
The gib (dry wall) goes on the walls and ceiling and gib stopped to prepare it for a final paint coating. The gib stopping and painting is recommended at this stage as that process generates a lot of very fine dust that will get into absolutely everything if if were in the room - hence better to do it when nothing is there. We have opted not to do the window and door architraves, nor floor or ceiling skirting, just to save money for now. This is something we can do ourselves at a later stage.
Some of the windows however have very shallow framing and hence needs more wood fixed to it to extend it out to the depth of our wall. This was because they came out of a house with slightly thinner walls. This will have to be revisited someday soon because the resulting affect is less than desirable to look at.
The painting gets finished just in time for us to move out of our portable cabins and into the shed. They were fun while they were there and served an important purpose, but we were glad to see them go. At roughly ~$100/week each, they do all add up.
So, after about 6 weeks on our land now, we have 1 cabin, a small shed, and a much more sizable shed. This marks Stage 2 of our move, and remains a temporary solution before we make the Stage 3 move to our house when that gets built. Hopefully that process will begin at the start of next year.
Hope you enjoyed that post, it took me literally weeks to write it ;)


 Timber framing is next to build up the walls, windows and doorways.


Regarding concrete... Do you have any sources of eco-concrete? Http://www.concreteideas.com/green-concrete
ReplyDeleteHi Steve, apparently Firth NZ does seem to employ some green features in their cement mix.
Deletehttp://www.firth.co.nz/media/87273/energy%20efficiency%20masonry%20construction%20jul%2010.pdf
However I do sometimes wonder if "Green Concrete" is a bit green wash used like "Clean coal" ... although maybe? not as bad. I have had a look a Magnesia based Cement, which seems to have far higher strengths, but lower moisture durability which is what you need for ground based foundations. The benefit with magnesia cement is that you don't require high kiln temperatures and hence save on energy costs. Part of the problem using this product is which of the ready mix companies will support this, in the geographic area, will need more of an in-depth research to find out that one.
Using green/renewable fuels for the creation of lime based concrete would certainly help reduce the embodied carbon (as firth claims to be using for supplementing their kilns), however this is unlikely to be practical seeing that we are starved for renewable energy sources as it is. Recycled concrete and aggregate is certainly a good idea, but as long as lime cement remains the binder, the embodied energy (hence carbon) is high.
I might have to grow more trees!
Having a smooth floor is definitely essential for keeping a shed clean. But having experienced the ease of sweeping a painted floor I would never go back to non-painted concrete. If you paint it grey, it doesn't show any chips and scratches.
ReplyDeleteEd
Having had a painted garage in Christchurch, I would agree entirely. I think we would paint it some day (at least the garage portion of it), just not now seeing that would have been more up front cost - the smooth floor is working adequately for now. We might get some 2nd hand tiles for the lined bay, and perhaps some woody laminate flooring as well depending on costs.
DeleteWow, that looks great. It must be wonderful to now be in something that's yours, after the rental and temporary cabins.
ReplyDeleteWhat will you guys do for house water in the longer term? Will you have mains, or collect rainwater, or something else? That shed roof looks like a nice catchment area.
Hi Darren,
DeleteNice to hear from you again. It IS great to have something that is ours, knowing that we don't have to move thing out of there for any kind of deadline. I still need to sort out enough space in there for a work bench however - but she's pretty tight maneuvering in there. It will get there in the end tho :)
Water wise, we are harvesting rain water with large 2x 24K (one below our house, and one up on the hill) litre tank storage which should last us a decent swag of time. The shed certainly has a good collection - though the bigger the surface area of the roof the more tank space you will need to buffer the runoff before it is dispersed into the water ways - this is a council requirement as part of the building consent. We will do this by reserving a portion (about 1/3) of the bottom collection tank as a buffer with a small orifice pipe to let it drain out - seems like a waste of water to me, but it prevents a huge downpour from overwhelming the water ways, which would normally trickle through the ground. I will be using a pump to get the water from the bottom tank to the top tank (about 30m of head).
Additionally we will create a small pond on our property to catch water from a nearby spring, so that we can use it to irrigate our crops - which will likely need more water than us!