Cooking with wood!
Howdy folks
... it was the middle of Feb 2014 when I last wrote to you. Times and
seasons have changed and many a blogging event has come and
gone - but alas absent was any corresponding blog post. Woe abounds ...
however, I've decided to break this stretch of silence and hopefully get
invigorated back into the swing of blogging our experiences at Atamai Village.
Rayburn Wood Cooker
As
with many folks building a new house we ran out of money shortly after
we moved in, so a few things are now on slower time scale. We hadn't been too cold this winter as the house is
equipped with great thermal insulation, and the sunny Motueka weather
gives us excellent solar gain which the house captures well. We have also managed by layering on more clothing when needed and occasionally using the
electric heater. However there is no doubt that things are more
comfortable with a bit more heat - particularly on those cold cloudy
winter days. A strong impetus to complete this project was to furnish us
with space heating, cooking and hot water from an alternative energy
source - locally grown firewood. We are planning on having coppice friendly
(you can trim them down, and they grow back again) firewood trees on our
lot to increase our energy diversity and reduce our dependence on external energy sources. We still love electricity for its convenience, however
having the ability to use alternative sources of energy readily
progresses us further along the resillience pathway. This is the key
theme here at Atamai Village.
After the flue, wetback and central heating system was installed, the system working as expected. For now we are burning up the remnants of the wood offcuts from our house build - particularly the untreated Larch from the weatherboard exterior cladding. The adobe wall behind the oven does a good job of absorbing the heat from the oven, releasing it slowly over a longer period.
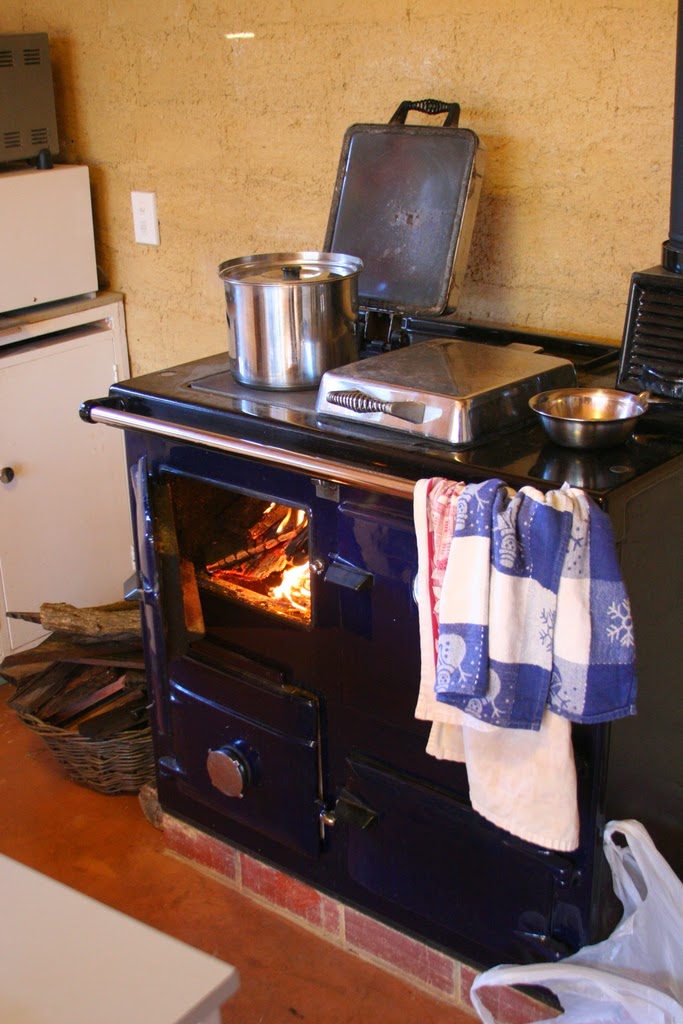
A closeup of the firebox ...

The temperature gauge on the oven presents a reasonable indication for how hot the oven is and if
it is ready for use or not. We also have an internal oven thermometer
which is more accurate which we used to calibrate the external
thermometer. The latter is more convenient to use.

The
Rayburn itself is probably 20 years old. We purchased it 2nd hand at a
very reasonable price from its previous owner in Queenstown. The cooker is well insulated and
operates as expected. Running the oven does require a bit of patience,
planning and experience. It might take us a while to master using it,
but we can manage it now quite effectively.
This
cooker is designed to run on both coal and wood, but of course we use
wood exclusively. Though it is worth noting that coal can burn twice as
hot and last twice as long - no wonder people moved towards using that
stuff! The cooker comes with a wetback that is capable of up to 16kw of
heating with coal, and 10kw of heating with wood.
We have hooked up the wetback as a thermosiphon (natural
convection) so as to negate the use of an electric pump. Below you can
see the wetback pipes coming through the wall into the boiler room which
is externally accessed and adjoins the kitchen wall. The wetback piping
goes directly into the bottom of a 270L buffer tank. This tank is open
vented but pressurised with a small header tank in the roof space above
the upper bedroom.

You
will notice that there are a bunch of temperature probe pockets as well
as additional outlets/inlets for energy injection to/from other
sources. I plan in the future to be able to heat the house in a variety
of methods (additional solar, external biochar kilns etc), so I'm keeping my
options open. The buffer tank can also be configured to feed heat into
the solar hot water tank - however we have decided not to implement this
bit for now as we are getting plenty of hot water from our solar hot
water system.
I sourced an intelligent adaptive pump, which modulates its power usage depending on the dynamic
characteristics of the valves on the distribution manifold. The manifold currently has proportioning valves (basically taps), but this may be converted into a fully or partially automated solenoid control system later (another project for when I'm bored :) ). For now the proportioning valves work well to regulate the flow of heat
into the various zones as previously installed.
This pump also optimises for power and draws a maximum of 30W of energy when
all valves are openned to the max - which constitutes 18L/min at a 4m
head. The energy consumption is particularly important because the pump is operating from an off-grid energy source and needs to take into account the total daily electrical energy budget that can be afforded from the battery system - we are targetting 5 kwhr/day.

The
system is also fitted with a variable thermal mixing valve to regulate
the water inlet temperatures going into the floor. It does this by
mixing the inlet temperature with the colder return line. This was
initially set to 25 degC to give the slab a gentle introduction to heat.
After a week this was tweaked to about 30-35 degC, and another week
later at 40 degC.

The
higher temperatures mean that more energy is transported in every litre
of water, and it is easier to target some areas more than others by
limiting the flow of water/heat into that area by tuning the
proportioning taps on the distribution manifold.

The manifold has cute little analogue temeperature dials - very steampunk-ish. These are great because you can monitor the inlet and outlet water temperatures and basically work out how cold or warm the particular circuit is by how much energy it is sucking out of the water. Failing which however, I've got 8 temperature probe pockets in the slab which I'll be installing networked temperature sensors to give me a better idea of what is happenning in the slab, even in places not furnished with hydronic water pipes.

The distribution manifold also has analogue flow meters installed which show how much water is flowing in a particular circuit - hence giving a sense for proportioning the amount of heat distributed in a particular heat circuit.

I
also installed a temperature controller to control the pump based on
the tank's temperature. I've set it so that the pump turns on when the tank
is at 50 degC, and turns off at 40 degC. The pump thus only operates
when there is sufficient heat in the tank to distribute.

So far the system is working well but I'm still experimenting with it and tweaking it so that I can best utilise the heat from the Rayburn cooker. I am looking at a means of using the buffer tank as a storage mechanism to delay the release of heat so that specific areas can be warmed up before we wake up from sleep. The concrete slab does remain relatively warm overnight, but having a boost at (say) 4am might give it just that extra touch of comfort ... in any case, that is a layered complexity and is not really required other than to keep my brain active :)
That's it for this post. My next post will not be far away, as I discuss my next interesting project ...
Biochar!


Comments
Post a Comment